
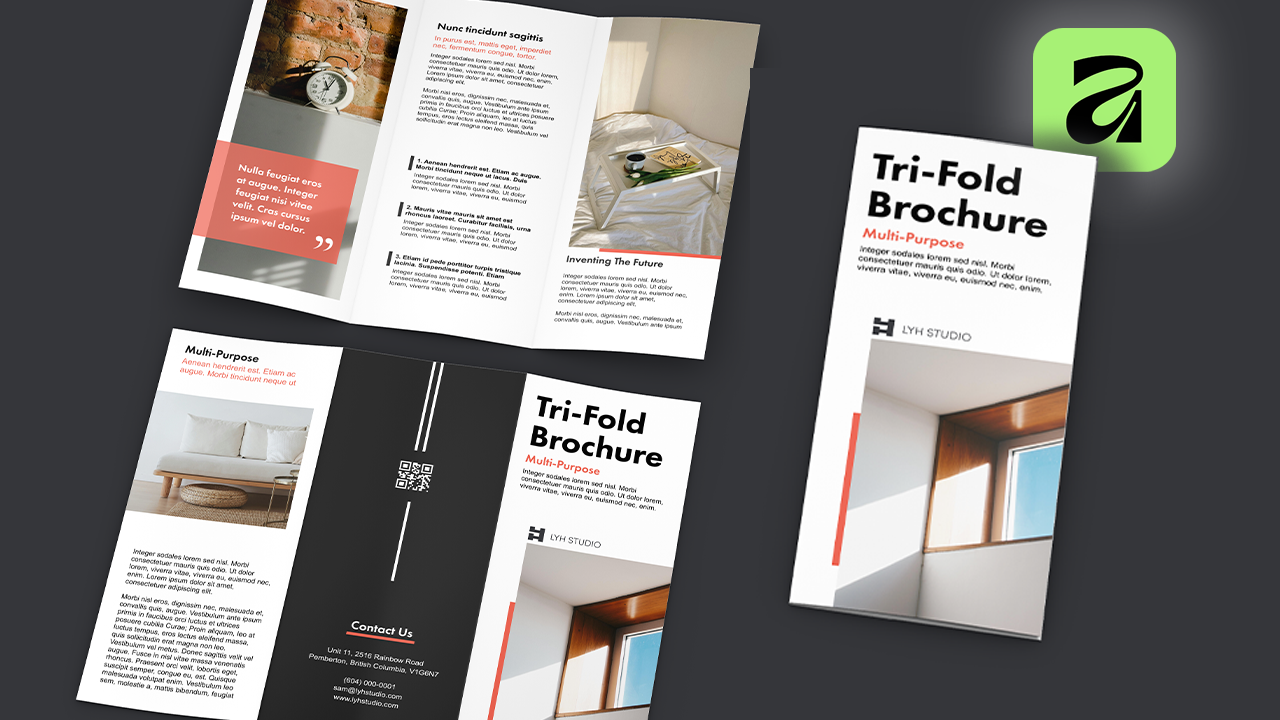
Tri-Fold Brochure in Affinity
Phase 1 — Document Setup
Step 1 — Create new document
Tools: New Document panel
Settings:
Size → Letter
Pages → 2
Turn off → Facing pages
Margins → 0.5 in
Bleed → 0.25 in
Step 2 — Understand panel sizing rule
Technique: Adjust fold widths
One panel must be slightly smaller than others
This prevents buckling when folded inward
Tools: View → Guides
Outside (Page 1):
Vertical guide → 3.607 in
Vertical guide → 7.274 in
Inside (Page 2):
Vertical guide → 3.725 in
Vertical guide → 7.392 in
Technique Tip:
Label pages with text (“Outside”, “Inside”) and lock guide layer so you don’t move them accidentally.
Phase 2 — Core Design Tools (You Only Need 3)
You will build the entire brochure using:
Picture Frame Rectangle Tool → images
Frame Text Tool → text blocks
Rectangle Tool → color shapes + highlights
Mastering these 3 = mastering brochure layout.
Phase 3 — Front Cover Layout
Step 3 — Add hero image
Tool: Picture Frame Rectangle
Drag frame to bleed edge
Drop image inside
Resize image inside frame
Step 4 — Add title text
Tool: Frame Text Tool
Font → e.g. Futura Demi
Size → ~48 pt
Adjust line spacing manually
Step 5 — Add subheading + body text
Techniques:
Subheading → bold + accent color
Body → ~10 pt black text
Step 6 — Add logo
Method: Drag-drop logo file → resize
Step 7 — Add accent bar
Tool: Rectangle Tool
Same color as subheading
Right-click → Arrange → Send to Back
You can try to use the arrange options for anything that fails to show up on your page.
Creates subtle visual hierarchy.
Step 8 — Reuse elements
Technique: Hold Alt / Option + drag
→ duplicates objects instantly
This speeds design and keeps styling consistent.
Phase 4 — Inside Spread Panels
Panel 1 — Image + Quote Block
Steps
Add full-height image frame
Add rectangle overlay (color block)
Paste quote text
Change text color → white
Reduce block opacity → ~80%
Design principle: Contrast + transparency adds depth.
Panel 2 — Q&A Text Layout
Steps
Create question text → bold
Duplicate text → make regular → answer
Add thin rectangle bars beside each question to emphasize bold text
Technique: This creates visual hierarchy instantly.
Panel 3 — Simple Image Panel
Reuse earlier method:
image frame
text block
accent rectangle
Phase 5 — Back Cover + QR Code
Step 9 — Add background panel
Tool: Rectangle Tool
Fill page with color
Right-click → Send to Back
Step 10 — Insert QR code
Tool: Rectangle Tool → right-click → QR Code Tool
Customize:
Change color
Data type → URL / Phone / SMS / Email
Paste link
This makes brochure interactive.
Phase 6 — Preview + Export
Step 11 — Preview design
Shortcut: Ctrl + Shift + W
→ toggles guides off
Export Recommended settings:
Format → PDF (Print)
Include bleed
Embed fonts